If you’ve ever tried to understand your business finances inside QuickBooks Online (QBO), you’ve probably come across the Chart of Accounts (COA). Think of it as the backbone of your accounting system—it’s where all your income, expenses, assets, and liabilities live. Whether you’re setting up QuickBooks for the first time or cleaning up messy accounts, customizing and editing your Chart of Accounts helps ensure your books stay clean, accurate, and easy to understand.

This guide walks you through step-by-step how to customize, edit, add, merge, and delete accounts in QuickBooks Online like a pro—no accounting degree required.
What Is The Chart Of Accounts In QuickBooks Online?
The Chart of Accounts is a complete list of all the financial accounts in your accounting system. Each account tracks a different part of your business, such as:
- Income (Sales, Service Income, Rental Income)
- Expenses (Utilities, Office Supplies, Advertising)
- Assets (Bank Accounts, Equipment, Inventory)
- Liabilities (Loans, Credit Cards, Taxes Payable)
- Equity (Owner’s Draw, Retained Earnings)
Every transaction in QuickBooks is tied to one of these accounts. That’s why customizing your COA is so important—it ensures your financial reports reflect the real structure of your business.
Why Customize Your Chart Of Accounts?
Many businesses don’t realize how powerful a well-organized Chart of Accounts can be. Here’s what customization can do for you:
- Make your financial reports clearer
- Help you understand where money is really coming from
- Simplify tax filing
- Improve budgeting and forecasting
- Avoid duplicate or confusing account names
- Keep your books clean and organized
A customized COA = better business decisions.
How To Access The Chart Of Accounts In QuickBooks Online
Before editing anything, you need to know where to find it.
- Log in to QuickBooks Online
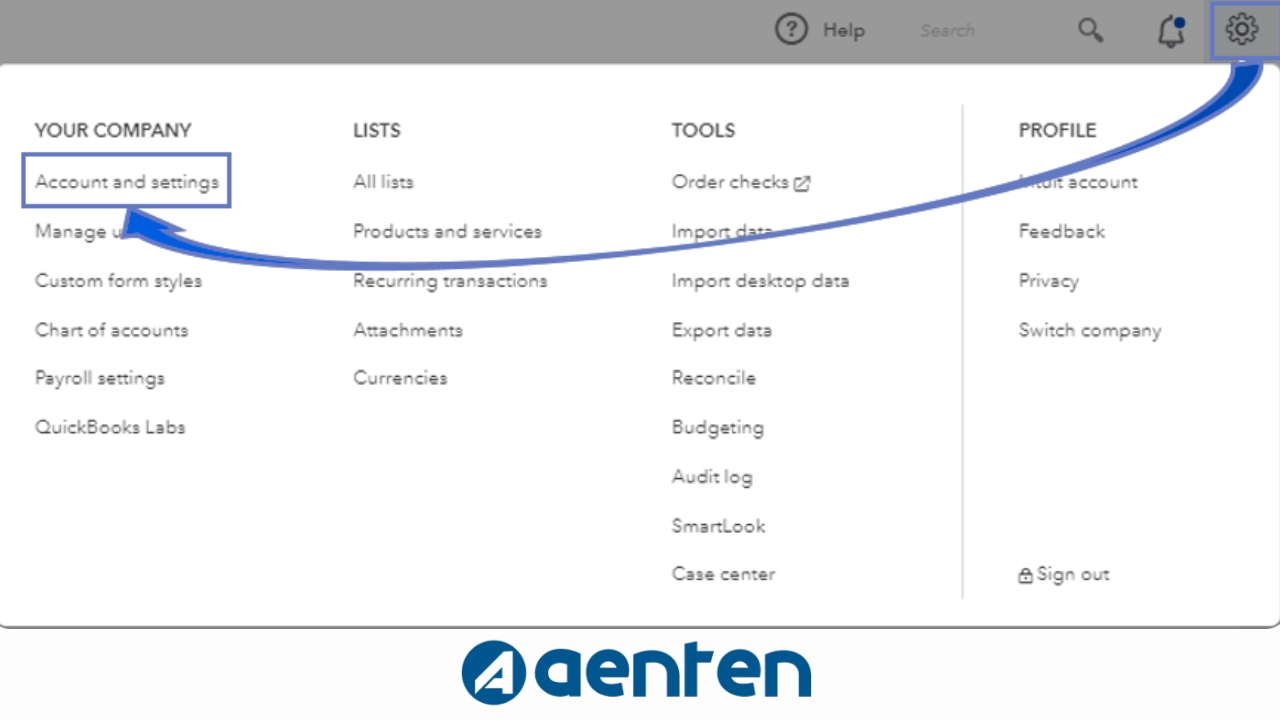
- Click the ⚙ Gear icon in the top right corner
- Under the Your Company section, select Chart of Accounts
You’ll now see your full list of accounts—this is your COA dashboard.
How To Edit An Existing Account
You may want to update an account’s name, type, detail type, or description.
Here’s how:
- Go to Chart of Accounts
- Find the account you want to edit
- Click the dropdown arrow on the right
- Select Edit
- Update the fields you need:
- Name
- Account Type
- Detail Type
- Description
- Click Save and Close
Tips For Editing Accounts :
- Only change Account Types if you know the impact—it affects how reports display.
- Changing names is completely safe and won’t break anything.
- Always double-check tax-related accounts before editing.
How To Add A New Account
Adding accounts helps categorize financial data more accurately.
Here’s how to add one:
- Open Chart of Accounts
- Click New (usually at the top right)
- Choose the Account Type (like Expense or Income)
- Choose the Detail Type
- Give the account a clear, simple Name
- Add a Description (optional but helpful)
- If needed, add an opening balance
- Click Save and Close
Naming Best Practices :
- Keep names short and consistent
- Avoid duplicate or unclear names
- Don’t over-create accounts—you want structure, not clutter
Example: Instead of “Office Supplies #1 / #2 / #3,” use one account with sub-accounts if needed.
How To Create Sub-Accounts
Sub-accounts help you organize categories more deeply.
Example:
Marketing Expense
↳ Facebook Ads
↳ Google Ads
↳ Print Advertising
To create a sub-account:
- Go to Chart of Accounts
- Click New
- Choose an Account Type
- Enter the name
- Check the box “Is sub-account”
- Select the parent account
- Save
Why Use Sub-Accounts? :
- Cleaner reporting
- Detailed spending breakdowns
- Helpful for tax prep and budgeting
How To Merge Accounts (Safely)
If you have multiple duplicate or similar accounts, merging is a great cleanup tool.
⚠ Important: Merging cannot be undone.
Steps to merge:
- Decide which account will be the main account
- Open the account you want to merge into the other
- Click Edit
- Rename it EXACTLY the same as the target account
- Choose the same Account Type and Detail Type
- Click Save
- When QuickBooks asks if you want to merge → select Yes
All transactions will move into the remaining account.
How To Delete (or Make Inactive) An Account
QuickBooks does not completely “delete” accounts—instead it makes them inactive. This keeps historical data safe.
To deactivate an account:
- Open Chart of Accounts
- Click the dropdown arrow next to the account
- Select Make inactive
- Confirm the action
Can you reactivate an account later?
Yes! Just filter by Inactive accounts and click Make active.
Best Practices For Managing Your Chart Of Accounts
A well-structured Chart of Accounts (COA) is the foundation of accurate financial reporting. In QuickBooks, your Chart of Accounts organizes every transaction into categories that power your Profit & Loss statement, Balance Sheet, and cash flow reports. When managed correctly, it improves clarity, compliance, and decision-making. Below are proven best practices to help you maintain a clean, scalable, and efficient Chart of Accounts in QuickBooks.
1. Keep It Simple and Organized
Avoid creating too many accounts. A cluttered Chart of Accounts makes reporting confusing and harder to manage.
Best Practice:
- Use broad parent accounts with sub-accounts for detail.
- Avoid duplicate or unnecessary categories.
- Review your accounts quarterly to remove unused ones.
Simplicity ensures better reporting and easier bookkeeping.
2. Follow Standard Accounting Structure
QuickBooks organizes accounts into five main categories:
- Assets
- Liabilities
- Equity
- Income
- Expenses
Always place accounts in the correct category. Misclassified accounts can distort financial statements and affect tax reporting accuracy.
3. Use Sub-Accounts Strategically
Sub-accounts provide detailed tracking without overwhelming your main reports.
Example:
Parent Account: Marketing Expense
- Digital Advertising
- Print Advertising
- Social Media Marketing
This approach keeps reports clean while allowing detailed expense tracking.
4. Maintain Consistent Naming Conventions
Consistency improves clarity and prevents confusion among team members.
Tips:
- Use clear, descriptive names.
- Avoid abbreviations that others may not understand.
- Keep naming formats uniform (e.g., “Office Supplies” instead of “Supplies – Office”).
5. Avoid Over-Customization
While QuickBooks allows customization, too many specific accounts can create reporting challenges. Before adding a new account, ask:
- Can this transaction fit into an existing category?
- Will this account be used regularly?
If not, consider using sub-accounts or classes instead.
6. Separate Business and Personal Expenses
Never mix personal and business transactions. Create clear accounts for business-related expenses only. This ensures accurate reporting and simplifies tax preparation.
7. Use Classes or Locations for Advanced Tracking
Instead of creating dozens of new accounts, use QuickBooks Classes or Location tracking for:
- Department-based reporting
- Multiple business units
- Project tracking
This keeps your Chart of Accounts streamlined while offering detailed insights.
8. Review and Reconcile Regularly
Regular account review ensures accuracy and prevents errors from compounding.
Monthly Best Practice:
- Reconcile bank and credit card accounts
- Review uncategorized transactions
- Check for duplicate accounts
- Confirm correct expense classification
Routine reviews keep your financial data reliable.
9. Plan for Future Growth
Your Chart of Accounts should grow with your business. Structure it with scalability in mind by:
- Creating flexible parent accounts
- Avoiding overly specific categories
- Designing for potential expansion (new services, locations, products)
10. Work with QuickBooks Professionals
Managing your Chart of Accounts properly requires both accounting knowledge and software expertise. Professional QuickBooks support ensures:
- Proper account structure
- Compliance with accounting standards
- Clean financial reporting
- Error prevention
At Aenten, our QuickBooks experts help businesses optimize their Chart of Accounts for clarity, accuracy, and long-term growth. Your Chart of Accounts is more than a list of categories — it’s the backbone of your financial system. By keeping it organized, simple, and scalable, you ensure accurate reporting, better cash flow visibility, and smarter business decisions.
Final Thoughts
Customizing and editing your Chart of Accounts in QuickBooks Online is one of the smartest things you can do to take control of your finances. With the tips and steps in this guide, you can confidently customize your COA in a way that fits your business perfectly—clear, organized, and built for success.