Quicken for Mac is a powerful personal finance management software that can help you take control of your financial life. Whether you’re looking to track expenses, manage budgets, monitor investments, or plan for taxes, Quicken offers a comprehensive suite of tools. In this step-by-step guide, we’ll walk you through every aspect of getting started with Quicken for Mac, from installation and setup to utilizing its features to optimize your financial journey.

Chapter 1: Preparing for Quicken Installation
Before you dive into using Quicken, let’s ensure you have everything in place for a smooth installation process.
- System Requirements: Check if your Mac meets the minimum system requirements for running Quicken for Mac.
- Stable Internet Connection: Ensure you have a stable and reliable internet connection for downloading and updating Quicken.
Chapter 2: Downloading and Installing Quicken for Mac
Follow these steps to download and install Quicken for Mac on your computer.
- Visit Quicken’s Official Website: Go to the official Quicken website and locate the download section for Quicken for Mac.
- Choose the Right Version: Select the version of Quicken for Mac that suits your needs (Starter, Deluxe, Premier, or Home & Business).
- Download the Installer: Click on the download link to get the Quicken installer for Mac.
- Run the Installer: Once the download is complete, run the installer and follow the on-screen instructions to install Quicken.
Chapter 3: Setting Up Quicken for Mac
Now that Quicken is installed, it’s time to set it up for your specific financial needs.
- Creating a Quicken Account: Open Quicken and create a Quicken account with your email address and a secure password.
- Linking Financial Institutions: Quicken allows you to link your bank accounts, credit cards, investment accounts, and loans for automatic updates.
- Initial Data Import: Choose the option to import your financial data from your linked accounts to Quicken.
Chapter 4: Navigating the Quicken Interface
Get familiar with Quicken’s user interface and navigation to make the most of its features.
- Dashboard Overview: Understand the dashboard that provides an overview of your financial situation.
- Navigation Tabs: Explore the different tabs for accounts, budgets, investments, and more.
Read Also : Comprehensive Guide : What Is Quicken Software?
Chapter 5: Creating and Managing Accounts
Now let’s set up your financial accounts in Quicken.
- Adding Accounts: Click on the “Add Account” button and follow the prompts to add bank accounts, credit cards, loans, and investment accounts.
- Customizing Account Names: Give each account a clear and descriptive name for easy identification.
Chapter 6: Linking Financial Institutions
Linking your financial institutions allows Quicken to fetch transaction data automatically.
- Search for Institutions: Search for your bank, credit card company, investment firm, etc., in Quicken’s database.
- Login Credentials: Provide your login credentials for each institution to establish the connection.
Chapter 7: Tracking Income and Expenses
Start tracking your financial transactions in Quicken.
- Transaction Entry: Manually enter income, expenses, and other transactions as needed.
- Automatic Transaction Downloads: Linked accounts will automatically update transactions, saving you time and effort.
Chapter 8: Budgeting with Quicken
Create and manage budgets to track your spending and achieve your financial goals.
- Creating a Budget: Set up a budget by categorizing spending and assigning limits.
- Budget Monitoring: Monitor your spending against your budget to stay on track.
Read Also : A Comprehensive Guide : What Is NetSuite ERP Software?
Chapter 9: Bill Tracking and Reminders
Never miss a bill payment with Quicken’s bill tracking and reminders.
- Adding Bills: Add your recurring bills and their due dates to Quicken.
- Bill Reminders: Quicken will provide reminders for upcoming bills, helping you avoid late fees.
Chapter 10: Investment Tracking and Analysis
Learn how to manage your investments with Quicken.
- Entering Investments: Enter your investment details, including stock purchases, dividends, and sales.
- Investment Analysis: Quicken provides tools to analyze investment performance and make informed decisions.
Chapter 11: Tax Planning and Reporting
Use Quicken to plan for taxes and generate necessary reports.
- Tax Estimations: Quicken helps estimate taxes based on your financial data.
- Tax Reporting: Generate reports that assist in preparing for tax filing.
Chapter 12: Loan and Debt Management
Track loans and debts to stay on top of your repayment schedules.
- Adding Loans: Add loans, mortgages, and credit card debts to Quicken.
- Payment Tracking: Track your loan payments and remaining balances.
Read Also : NetSuite Optimization : Are You Getting the Most Out of NetSuite?
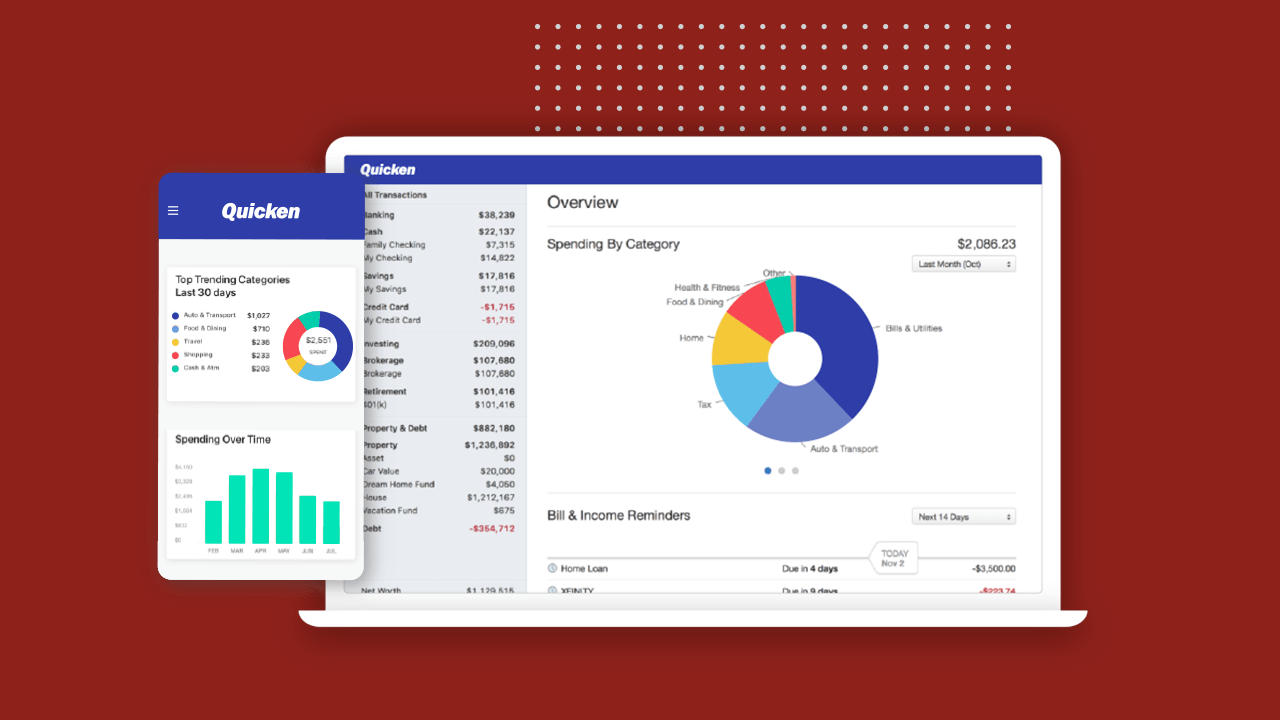
Chapter 13: Generating Reports
Generate reports to gain insights into your financial health.
- Selecting Report Types: Choose from various report types such as income and expense reports, net worth reports, and investment reports.
- Customizing Reports: Customize report parameters to focus on specific timeframes and categories.
Chapter 14: Syncing with Mobile Devices
Sync your Quicken data with mobile devices for access on the go.
- Mobile App Download: Download the Quicken mobile app from the App Store.
- Syncing Data: Follow the app’s instructions to sync your Quicken data with your mobile device.
Chapter 15: Security and Data Privacy
Understand the security measures Quicken employs to protect your financial data.
- Encryption: Quicken uses encryption to safeguard your sensitive information.
- Password Protection: Set a strong password to secure access to your Quicken data.
Chapter 16: Troubleshooting and Customer Support
Learn how to troubleshoot common issues and seek help from Quicken’s customer support.
- Official Resources: Explore Quicken’s official website for FAQs, user guides, and troubleshooting tips.
- Customer Support: Contact Quicken’s customer support for personalized assistance.
Read Also : Guide : How NetSuite Can Help Your Business Streamline Operations?
Chapter 17: Advanced Tips and Tricks
Discover advanced features in Quicken to optimize your financial management experience.
- Custom Categories: Create custom categories to suit your unique spending patterns.
- Advanced Reporting: Explore advanced reporting features to gain deeper insights into your finances.
Chapter 18: Staying Current with Updates
Keep your Quicken software up to date to access new features and security enhancements.
- Automatic Updates: Enable automatic updates to ensure you’re always using the latest version.
- Manual Updates: Check for updates manually if needed.
Chapter 19: Real-world Applications
Explore how Quicken can be applied in real-life scenarios, from managing personal budgets to small business accounting.
- Personal Budgeting: Use Quicken to create and stick to a personal budget.
- Small Business Accounting: Adapt Quicken for small business financial management.
Chapter 20: Future Trends and Developments
A glimpse into potential future advancements in Quicken for Mac, such as new features, enhanced mobile experiences, and technological integrations.
Note : Aenten provides Quicken Support Services Services for Small businesses.
Conclusion
You’ve successfully navigated through the step-by-step guide to getting started with Quicken for Mac. From installation and setup to utilizing its features for budgeting, tracking expenses, managing investments, and more, you’re now equipped to take control of your financial journey using Quicken. Remember, this guide serves as a foundation; continue exploring and experimenting with Quicken’s capabilities to optimize your financial management experience and achieve your financial goals.